The OpenBSD installer is text-based, the number of questions is manageable, and many of them have sensible defaults. Behind this concise process, however, lies more than copying files from installation media to a disk.
Even before the first boot, there is the question of whether the installation image can be trusted. During installation, bsd.rd is already running an OpenBSD system that detects hardware, configures network interfaces, and works with disks. The installer’s answers subsequently become configuration files, file systems, user accounts, and other components of the resulting system.
Even the message that the installation has been successfully completed is not yet the end: OpenBSD can perform one-time tasks during the first boot, and a freshly installed release does not necessarily already contain all Errata patches published since its release.
In the following, we install OpenBSD 7.9 on amd64 and look not only at what to enter in the installer, but also at what these decisions do in the resulting system.
Download and Verification
For amd64, OpenBSD provides, among other files, install79.img for USB sticks and other storage devices, as well as install79.iso for optical and virtual drives. Both complete installation images contain the installation system as well as the release’s Base and X sets.
Before booting from them, we verify the image.
mkdir -p ~/iso/openbsd/7.9/amd64
cd ~/iso/openbsd/7.9/amd64
wget https://cdn.openbsd.org/pub/OpenBSD/7.9/amd64/install79.img
wget https://cdn.openbsd.org/pub/OpenBSD/7.9/amd64/SHA256.sig
wget https://cdn.openbsd.org/pub/OpenBSD/7.9/openbsd-79-base.pub
The three files serve different purposes. install79.img is the installation image. SHA256.sig contains the signed checksums of the release files. The public release key is required to verify their signature.
With signify(1), the signature can be verified while simultaneously checking the image against the authenticated checksum:
$ signify -C -p openbsd-79-base.pub -x SHA256.sig install79.img
Signature Verified
install79.img: OK
The two success messages answer two related questions. The signature confirms the authenticity of the checksums being used relative to the public key being used. The subsequent check confirms that install79.img matches its authenticated checksum.
A simple SHA256 check is not sufficient for this. It can determine whether an image matches a particular checksum, but it does not answer the question of where that checksum came from.
How Do We Know the Key Is Correct?
This shifts the trust question by one level.
On an existing OpenBSD installation, the designated release keys are located under /etc/signify/. For an initial installation, the public key itself must come from a trusted source or be independently compared with the information published by the OpenBSD project.
A filename such as openbsd-79-base.pub does not, by itself, make a file a trusted key.
Creating the Installation Media
The verified install79.img can be written directly to a USB stick:
# dd if=~/iso/openbsd/7.9/amd64/install79.img of=/dev/sdX bs=1M
/dev/sdX is only a placeholder. dd overwrites the specified target without asking for confirmation. Before writing, you therefore need to verify which device actually corresponds to the USB stick.
The stick does not need to be formatted beforehand. The image already contains the required disk structure.
For a virtual machine, install79.iso can instead be attached as virtual installation media.
bsd.rd Is Already Running OpenBSD
After booting from the installation media, the system loads bsd.rd. This is a kernel with an integrated RAM disk that provides a compact environment for installation, upgrades, and maintenance tasks.
This point is important for understanding the entire installation process: OpenBSD is already running during the installation.
The kernel detects hardware and attaches the appropriate drivers. The installation system can configure network interfaces, examine disks, create and mount file systems, retrieve files from the network, and execute programs. What it primarily lacks compared with the subsequently installed system is its own persistent system state on the target disk.
That is precisely the state the installer creates.
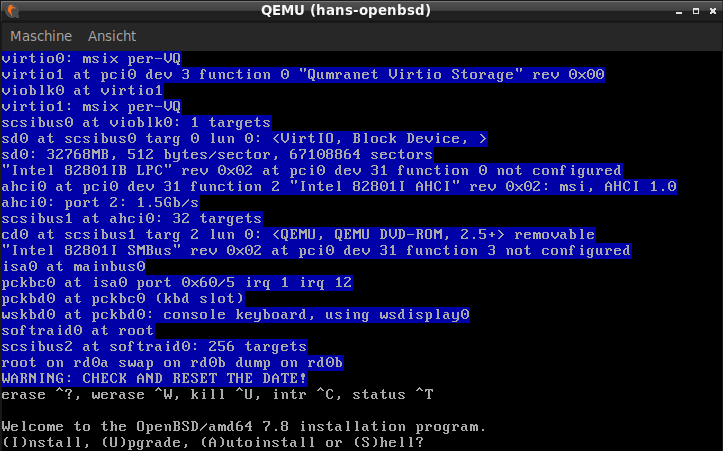 Image: OpenBSD 7.9 has already detected hardware before the actual installation dialog begins.
After initialization, the following appears:
Welcome to the OpenBSD/amd64 7.9 installation program.
(I)nstall, (U)pgrade, (A)utoinstall or (S)hell?
The options are:
- (I)nstall – new installation
- (U)pgrade – upgrade an existing installation
- (A)utoinstall – automated installation
- (S)hell – shell of the installation system
For our new installation, we select I.
The installer also points out a useful property of this environment:
At any prompt except password prompts you can escape to a shell by
typing '!'. Default answers are shown in []'s and are selected by
pressing RETURN.
At almost any prompt, ! temporarily switches to a shell within the same running bsd.rd environment. There, hardware, networking, or disks can be examined, for example. exit then returns to the installer.
Aborting the installer with Control-C is different. The installer explicitly warns that doing so can leave a partially modified system in an inconsistent state.
During startup, the following message may also appear:
WARNING: CHECK AND RESET THE DATE!
An obviously incorrect system time should be corrected before performing tasks that depend on accurate time. We cover persistent time synchronization later during system configuration.
Keyboard Layout
The first interactive dialog asks for the keyboard layout. ? or L displays the available layouts.
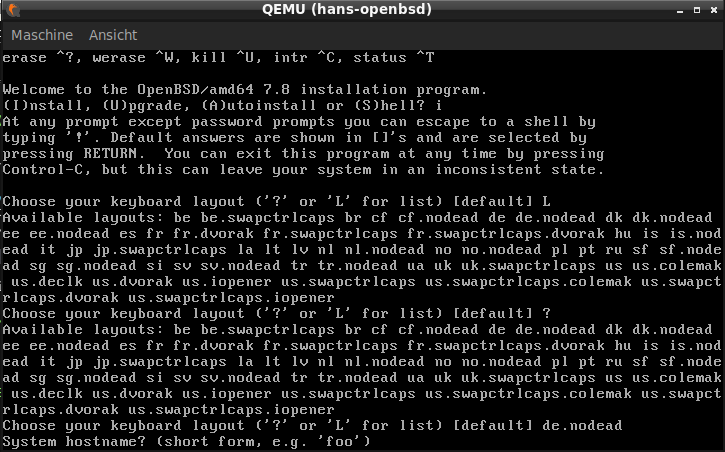 Image: Selecting
 de.nodead during our installation.
For German keyboards, available layouts include de and de.nodead. Which variant is appropriate depends on personal working habits.
Hostname and Network
The installer first asks for a short hostname:
System hostname? (short form, e.g. 'foo')
Among other things, this answer later becomes /etc/myname.
Next, the network interfaces detected by the kernel are offered. In our virtual machine, for example, vio0 appears; on other hardware, different names may appear depending on the driver.
IPv4 and IPv6 are configured separately:
IPv4 address for vio0? (or 'autoconf' or 'none') [autoconf]
IPv6 address for vio0? (or 'autoconf' or 'none') [autoconf]
The two questions concern independent protocol configurations. We cover the differences between automatic IPv4 and IPv6 configuration in more detail in the networking chapter.
With automatic IPv4 configuration, for example, the following file may be created on the installed system:
/etc/hostname.vio0:
inet autoconf
A static IPv4 configuration could instead look like this:
/etc/hostname.em0:
inet 192.168.1.10 255.255.255.0
A static default route is configured separately through /etc/mygate.
The sequence is important: the network does not become active only after installation. bsd.rd configures the interface in the running installation system. This is what makes it possible, for example, to retrieve sets over HTTP. From the decisions made during this process, the installer subsequently creates the persistent network configuration for the target system.
During subsequent boots, netstart(8) processes this configuration.
IP connectivity and name resolution are also separate functions. A correctly configured interface does not automatically mean that DNS works. We will encounter this distinction again during the first boot.
Root, User, and SSH
During installation, several decisions are made about administrative access. They are related, but they are not the same thing.
First, the local root account receives a password:
Password for root account? (will not echo)
Password for root account? (again)
The installer then asks whether sshd(8) should be started by default:
Start sshd(8) by default? [yes]
The existence of a root account and a running SSH daemon does not yet mean that root is allowed to log in via SSH.
The installer also offers to create a regular user:
Setup a user? (enter a lower-case loginname, or 'no') [no]
This user becomes a member of the wheel group. This is followed by the separate decision about root logins via SSH:
WARNING: root is targeted by password guessing attacks, pubkeys are safer.
Allow root ssh login? (yes, no, prohibit-password) [no]
 Image: User creation and the separate decision about root logins via SSH.
However, membership in wheel does not automatically mean that the user is allowed to use doas(1). Authorization is controlled through /etc/doas.conf, and the installer does not create this file automatically.
After the first login, for example, the following simple policy can be configured:
$ su -
Password:
# echo "permit persist :wheel" > /etc/doas.conf
# exit
$ doas whoami
root
Here, membership in the wheel group is an attribute referenced by the doas rule. The actual authorization is created only by that rule.
X Window System
On amd64, the installer asks:
Do you expect to run the X Window System? [yes]
This question does not determine which X sets are installed. It concerns the intended use of a local X server.
If yes is selected, an additional question follows:
Do you want the X Window System to be started by xenodm(1)? [no]
Three decisions therefore need to be distinguished:
- install X sets on the system
- provide for a local X server
- start
xenodm(1)at boot
This distinction is particularly important on servers. Whether X sets are needed cannot be determined solely from whether a graphical environment will be used.
Serial Console
The installer can switch the default console to a serial interface:
Change the default console to com0? [no]
This is particularly relevant for headless machines or systems with a serial remote console. For systems with a normal local or virtual console, the default no is often appropriate.
A serial console can also be configured later through /etc/boot.conf. We cover the details in the boot configuration chapter.
Time Zone
During installation, the time zone is set, for example, with:
What timezone are you in? ('?' for list) [Europe/Berlin]
In our installation, Europe/Berlin was offered as the default. The displayed default belongs to the specific installation run and is not a general statement about which time zone the installer suggests on every system.
Disks and Encryption
The installer displays the detected disks:
Available disks are: sd0.
Which disk is the root disk? ('?' for details) [sd0]
Before proceeding with disk partitioning, the OpenBSD 7.9 installer in our installation run asks about possible encryption of the root disk:
Encrypt the root disk with a (p)assphrase or (k)eydisk? [no]
With a passphrase, the encrypted volume must be unlocked during boot before the system stored within it can be accessed. This protects data in particular on a powered-off or stolen disk.
MBR, GPT, and Disklabel
On amd64, we encounter several layers during disk configuration.
In our installation, the installer then asks:
Use (W)hole disk MBR, whole disk (G)PT or (E)dit? [whole]
MBR and GPT describe the outer disk structure. Within the area designated for OpenBSD, OpenBSD additionally uses its own disklabel.
The disklabel describes the OpenBSD-internal partitions. Typically, a contains the root file system and b contains swap. The c entry has a special meaning: it represents the entire disk and is not another normal file system partition.
The installer can create an automatic layout:
Use (A)uto layout, (E)dit auto layout, or create (C)ustom layout? [a]
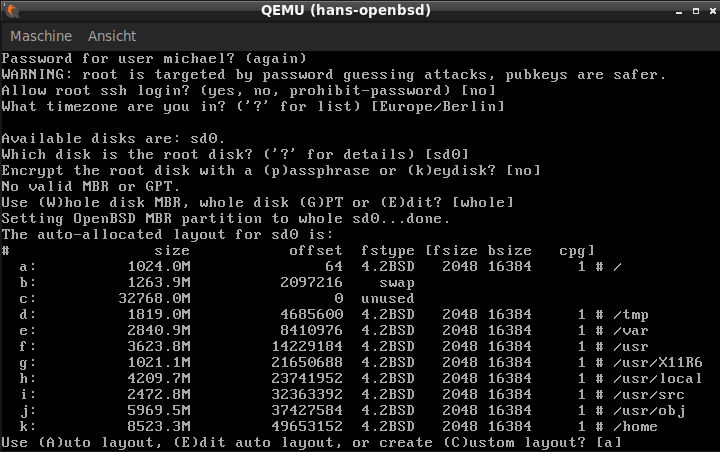 Image: Automatically generated disklabel for our 32 GB installation.
In this installation, separate areas are created for /, swap, /tmp, /var, /usr, /usr/X11R6, /usr/local, /usr/src, /usr/obj, and /home, among others.
This specific partitioning is not a fixed OpenBSD default layout. The automatic layout depends, among other things, on the size of the disk. The suggested layout may therefore look different on another disk.
Separate file systems also create system boundaries. A full /var, for example, does not have to consume the space reserved for /. Later, the individual file systems can also be given different mount properties.
The screenshot also shows /usr/X11R6. Its presence in the disk layout does not mean that X sets must necessarily be installed later. Disk layout and software selection are two separate decisions.
The Base System Sets
OpenBSD distributes its Base System in so-called sets. They belong to the respective release and should not be confused with additional packages from the Ports/Packages Collection.
On amd64, OpenBSD 7.9 uses, among others:
- bsd – GENERIC kernel
- bsd.mp – multiprocessor kernel
- bsd.rd – RAM-disk kernel for installation and maintenance
- base79.tgz – fundamental Base System
- comp79.tgz – compiler, headers, and development tools
- man79.tgz – manual pages
- game79.tgz – text-based games
- xbase79.tgz – X11 base libraries and utilities
- xfont79.tgz – X11 fonts
- xserv79.tgz – X11 server
- xshare79.tgz – shared X11 files, manual pages, locale data, and includes
bsd and base79.tgz are required for installation. OpenBSD recommends that new users in particular install all sets.
What Does Minimal Mean on a Server?
On a publicly accessible server, it makes sense to know which parts of the system base are actually needed.
Base System code that is not installed is not part of the running system base and does not require its own Base System patches on that system. However, this does not automatically mean that a server without a graphical environment can do without all X sets.
The X sets serve different purposes. xserv79.tgz contains X servers, while xbase79.tgz also contains libraries that may be required by programs without their own graphical interface.
For security considerations, several questions therefore need to be kept separate: Is a component installed? Is it started? Is it itself reachable from the network? Or is it used by a reachable process to process data?
A deliberately reduced production server can have a smaller system base. The selection should, however, result from its specific purpose and actual dependencies—not solely from the category “server.”
A machine on which ports are built also has different requirements from a production server that uses prebuilt binary packages. When building from the Ports Tree, the required system components depend on the particular port and its dependencies. Some ports do not require X11 components, while others need X11 libraries or additional components. A deliberately reduced production server is therefore not automatically a suitable build environment.
Selecting Sets
The installer allows individual sets or patterns to be removed from the selection.
In our example installation, we remove:
-x*
and then:
-g*
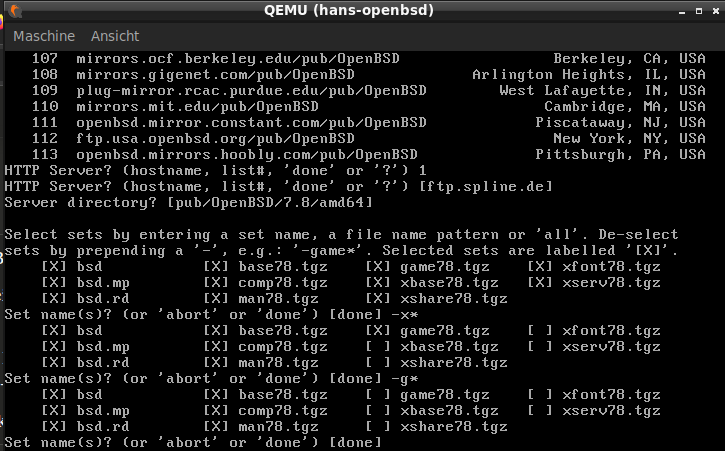 Image: The specific set selection for our installation with
 -x* and -g*. It is not a general recommendation for every server.
Sets from the Installation Media or the Network
With install79.img and install79.iso, the release sets are already present on the complete installation media. If this image was successfully verified before booting, the embedded sets are contained within this already verified artifact.
Alternatively, the installer can retrieve the sets over HTTP, for example:
Location of sets? (cd0 disk http nfs or 'done') [done]
Which default appears here depends on the installation path so far and the available sources.
During an HTTP installation, the sets are downloaded by the already running installation system. The installer verifies the associated signatures and checksums before installing them.
 Image: Download, verification, and installation of the sets over HTTP.
The distinction is small but important: With the complete installation image, the chain of trust begins with our verification before booting. For sets retrieved over the network, the already running installer—which was previously booted from a trusted source—subsequently verifies the newly received data.
During a mirror installation, the selected OpenBSD source is also stored in /etc/installurl. It is later used as a starting point by pkg_add(1), syspatch(8), and sysupgrade(8), among others.
Completing the Installation
After installing the sets, the installer saves the configuration, creates the required device nodes, and prepares the target system for booting.
In our OpenBSD 7.9 installation, the following appears, among other messages:
Saving configuration files... done.
Making all device nodes... done.
Multiprocessor machine; using bsd.mp instead of bsd.
fw_update: add intel; update none
Relinking to create unique kernel... done.
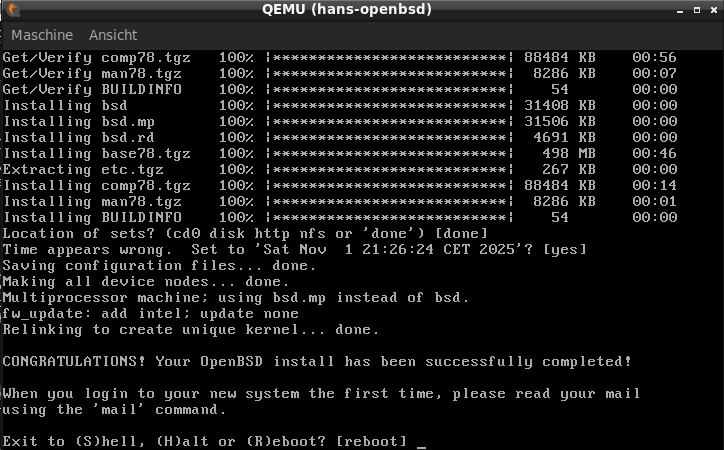 Image: Final phase with kernel selection, firmware check, and kernel relinking.
On the multiprocessor system, bsd.mp is installed as /bsd. OpenBSD also performs firmware-related tasks and relinks the kernel. We cover the details of Kernel Address Randomized Link, KARL, later in the security mechanisms chapter.
Finally, the installer reports:
CONGRATULATIONS! Your OpenBSD install has been successfully completed!
The installation has now been successfully completed. However, this does not mean that all one-time initialization tasks for the new system have already been performed.
The First Boot
After the reboot, the installed system takes over for the first time.
OpenBSD uses /etc/rc.firsttime for tasks that are to be performed exactly once during the first boot. rc(8) processes this file once and then removes it.
Our example installation from June 9, 2026 shows an interesting error:
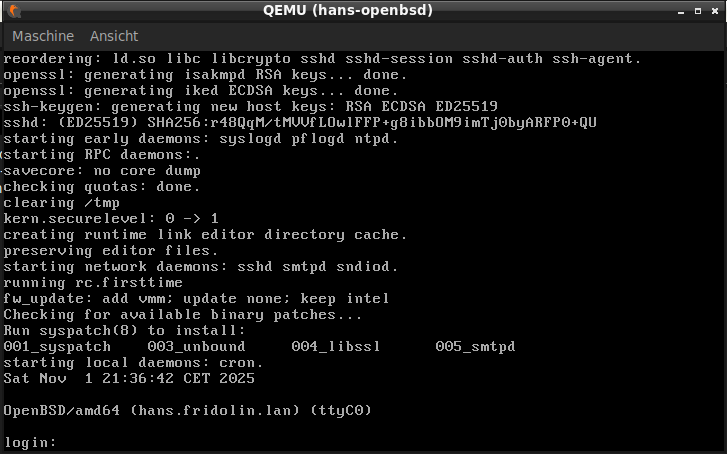
Image: First boot on June 9, 2026, with rc.firsttime, a failed firmware download, and subsequent normal system startup.
running rc.firsttime
fw_update: failed
Cannot fetch http://firmware.openbsd.org/firmware/7.9/SHA256.sig
error: firmware.openbsd.org: no address associated with name
Here, fw_update cannot resolve the hostname of the firmware server. The boot process continues nonetheless.
The example shows why precise distinctions are necessary when troubleshooting. A functioning network interface does not mean that DNS also works. And a failed first-boot action does not necessarily mean that the entire system is unable to boot.
What always matters is which operation failed and what function it serves for the system.
Errata and syspatch
During this installation on June 9, 2026, the first boot subsequently reports two binary patches available at that time:
Checking for available binary patches...
Run syspatch(8) to install:
002_smtpd
003_vmd
These numbers document the patch level at that point in time. They do not indicate which Errata patches are available for OpenBSD 7.9 today.
A freshly installed release may already be missing known fixes. There is no contradiction in this: the installation media contains the release state as published. After its publication, bugs or security issues may have become known and been fixed.
OpenBSD documents such relevant fixes as Errata.
A single Erratum refers to an announced correction; Errata is the plural or the collection of these corrections. The patch is the technical change. syspatch(8) manages the corresponding binary Base System patches on supported releases.
The patches found during boot are not installed automatically:
$ doas syspatch
Installed patches are shown by:
$ syspatch -l
Patches that are still available can be displayed with:
$ syspatch -c
Before replacing files, syspatch stores rollback data under /var/syspatch.
For a deliberately reduced system, the set selection remains relevant here as well: If a set is absent, the associated Base System code is not installed solely because a patch for it has been published.
Base System and Packages
syspatch maintains the OpenBSD Base System. Additional software from the Ports/Packages Collection has a separate management path.
Binary packages are installed with pkg_add(1):
$ doas pkg_add packagename
Already installed packages can, for example, be updated with:
$ doas pkg_add -u
This separation is more than a difference in command interfaces. The Base System and additional packages are distinct components of the OpenBSD system and have their own life cycles.
We therefore cover package management in greater detail later in the Fundamentals series.
What the Installer Leaves Behind
After installation and the first boot, the dialog questions are gone. Their results remain as system state.
Depending on the selected configuration, this includes, for example:
/etc/myname/etc/hostname.*/etc/mygate/etc/resolv.conf/etc/installurl/etc/fstab- user accounts
- MBR or GPT structures
- the OpenBSD disklabel
- file systems and swap
- kernel and boot components
- the selected Base System sets
- additional firmware, where applicable
The OpenBSD installation can therefore be understood better as the creation of persistent system state than as the copying of a few archives.
We started from external, verified installation media. bsd.rd initially provided a transient, running OpenBSD system. The installer then translated our decisions into persistent state on the target system. During the first boot, one-time tasks were performed, and syspatch can subsequently bring the Base System up to the release’s current Errata patch level.
The foundation is now in place. The next step is no longer about getting OpenBSD onto the machine, but about configuring the resulting system for its specific purpose.
Information Used
This guide applies to:
- OpenBSD: 7.8 and 7.9
- Installation example and screenshots: OpenBSD 7.9 on amd64
- Example installation: June 9, 2026
- Context: Fundamentals for server and general installations
- Status: August 2026